


| Home | Parent | ← Go → | Prior | Next |
Smarky
Synmark
Markster
BookMacster
Click one of the download links, and wait “a minute” for the download to complete.
If you are running a recent version of macOS, you will be asked to confirm that you would like to download the application. Click Continue.
Once you’ve got the Smarky, Synkmark, Markster or BookMacster application package, indicated by its icon, drag it to your /Applications folder.
The app must have License Information or it will refuse to save or export your bookmarks. A no-cost Demo License is sufficient.
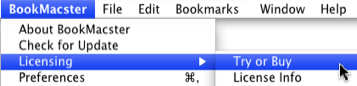
To license the app, click in the application menu > Licensing > Try or Buy.
If the app does not find License Information when you command it to Save or Export, it will prompt you to either get a Demo (Trial) License, or purchase a Single-User License. In either case, the License Information is retrieved from our server and installed automatically.
License Information consists of two items:
Both items are necessary. The License Key is a long number which is impossible to remember. The app stores these two pieces of information in the Home folder of the account where it was licensed. If you click “Yes” or check the box during installation, the information will also be installed at the “root” or “system” level where it will be available to other users’ accounts on the computer. You should copy and store your license information in your personal back-up database, in case you ever lose the data in your home folder. (Assuming you back up your home folder regularly, which you should, this would be a backup backup.
If you are using the app on more than one Mac, there is usually no need to transfer your License Information manually, because Smarky, Synkmark, Markster and BookMacster thoughtfully embed their License Information in every Collection (.bkmxDoc) file that you create. When you open such a document on another Mac account which does not currently have a regular license, as you will do if you transfer your bookmarks there using a Online File Syncing Service, a local network, or other file syncing service, the app on this Mac will read the License Information and store it permanently on the second Mac. To verify that, click in the menu: Licensing > License Info and see that it has magically appeared.
There are several situations in which you must install License Info manually:
You have purchased additional steps or seats to obtain a Volume License. (However, in this case you should have received a license installer file, which you can pass to and run on the additional computers – it’s much easier than the methods described here.)
For whatever reason, you purchased your license via some other than the automatic, built-in method.
You moved to a new computer and did not copy or “migrate” your home folder from your old to your new computer.
Note: These procedure works only for purchased licenses. Free demo (trial) licenses will not work if they are transferred to another Mac. Instead, simply request another demo (trial) on the other Mac.
If you cannot use the Just Works method for some reason, read on.
The first step is to obtain your License Information. If you can’t find your record of it, try one of these sources:
Your email receipt. The email message that you received from sales@sheepsystems.com at the time of purchase contains your License Information.
Your other computer on which the app is licensed and working. Launch the app and from the application menu choose Licensing > License Info. You will see the Licensee Name and License Key.
Us. If none of the above work for you, visit our Request Lost License Info form. Usually within 24 hours, we’ll look you up in the database and send you personalized document file with filename extension .…licenseinstaller which will install your License Information for the current Macintosh user account, on any Mac with the desired app installed, simply by doubleclicking it.
If you don’t have the .…licenseinstaller file, but have the “bare text” License Information, you must now open the TextEdit or similar text-editing application. Into a new document, copy and paste the License Information. Your text document should look something like this:
    Licensee Name:
    Suzie B. Bookmarker

    License Key:
    mIFAsGXquSA+i1hPdrO2YbRV6iIc+62CNLVmmTAnv/3KiIZezYhezb
    tUzXnkpNsLxBgksSf0g5MlTHswgcNpFsd3D4cxxZ59cVZEo67xdKi8
    s56HFaQfl7zdGn9BPAT8yKlHRgzRQPrsJ3eIkVT4/BB9WjXyjgtn8n
    DQuOSoXs61HLTj1ThfVidWO754rXIsCaLGSh7GpfVDUfMKXIr3b9CX
    atF+fvGhz1C9KoqZLIG/0ieAmlV7ruLOKWz/aX2Zd4PhkQPn6+N7AM
    dWocyjPap34/Lb3G6mqZ8g8s5PXmzNbaHZ0fTtL/oPd13JJoEad8AK
    CVw16oDZNVxpOe+S4Y==
Save the document and send its file as an email attachment, or else pass it via your local area network to the other computer(s).
Finally, to install your License Information at a destination computer, launch the app, from the application menu menu select Licensing > License Info, then type or paste the Licensee Name and Serial Number respectively into the two fields. When they are correct, the letters will turn from red to black.
| Home | Parent | ← Go → | Prior | Next |